Please note i take no responsibility for any damages you may or may not cause to yourself or others while you attempt to reenact my feeble steps below. If you chose to do this, it is solely your responsibility should it have any adverse effects or affects on your vehicle or any other vehicle around you or person or plant matter.
Things you will need:
1. Angle grinder
2. 1 mm cutting disks
3. replacement OEM exhaust, or use your own (i used one which was donated by zxsixr03, thanks mate
 )
)4. MIG welder or a friend who knows how to weld stainless steel (in this case i had Gazza, thanks mate
)For costs, most of you should have an angle grinder in the garage somewhere, if not you can pick one up cheap. If you don't have any cutting disks laying around, it would be a good idea to go out and buy about 5-6, maybe less if you buy quality ones, but i was at Bunnings so i bought some Bunnings cheapies and i ended up using all of them (may also have something to do with my grinding skills, or lack there of).
So to recap on the costs, for the disks i ended up paying about $12 for 5
Angle grinder i had, but you can pick one up for $30 or so
Exhaust was donated, so find a donor or check ebay or your local wrecker, Ive seen these things going for about $50. Ultimately you could use your own, but if you stuff it, then you are screwed!
Welder, not everyone has one laying around, so become friends with someone who knows how to weld, or take it to your local exhaust place who would probably do it cheap for you as long as you deliver it in a ready to weld state.
I am not going to get into how to remove the exhaust, but to touch on it briefly...remove both seats, remove black side plastics under the seat/tank, remove tail plastic, remove indicators and rear fender. loosen the clamp holding muffler to pipe, loosen bolts holding muffler to tail and wiggle free.
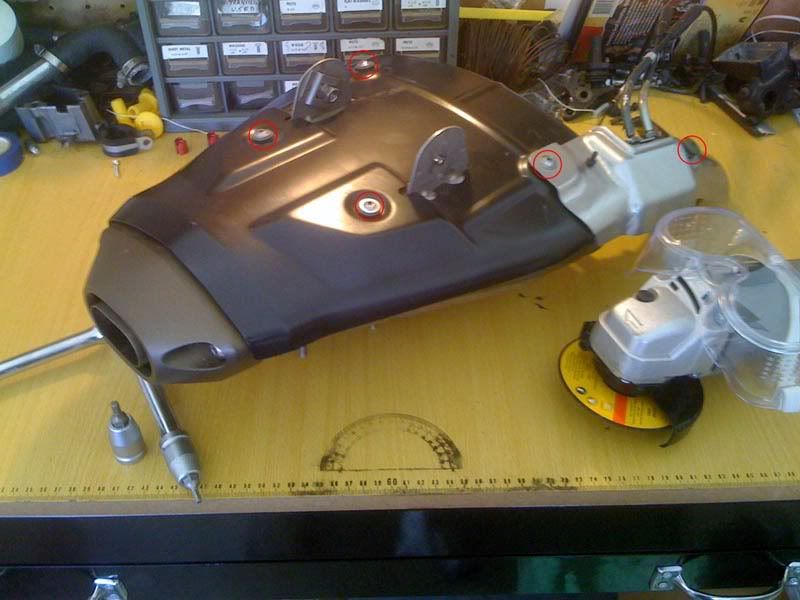
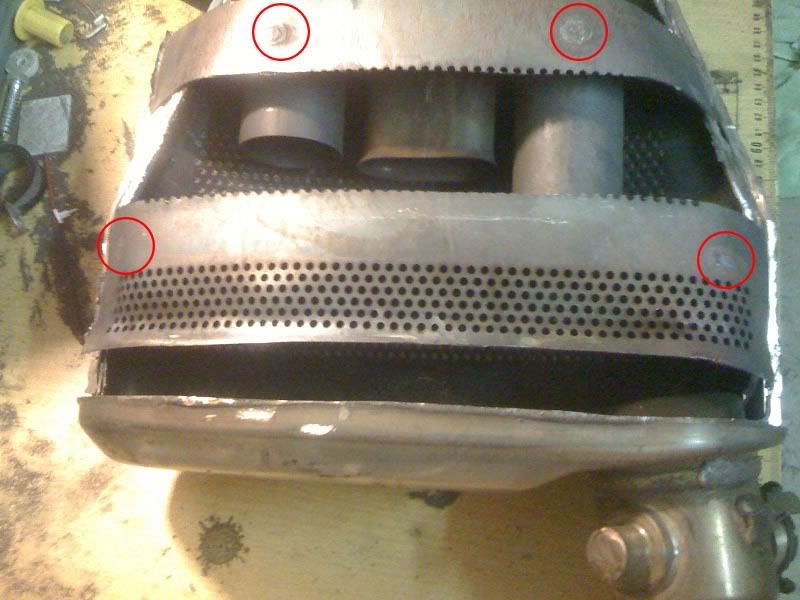
With the exhaust on the bench remove the heat shields from the muffler, targeting the bolts circled below
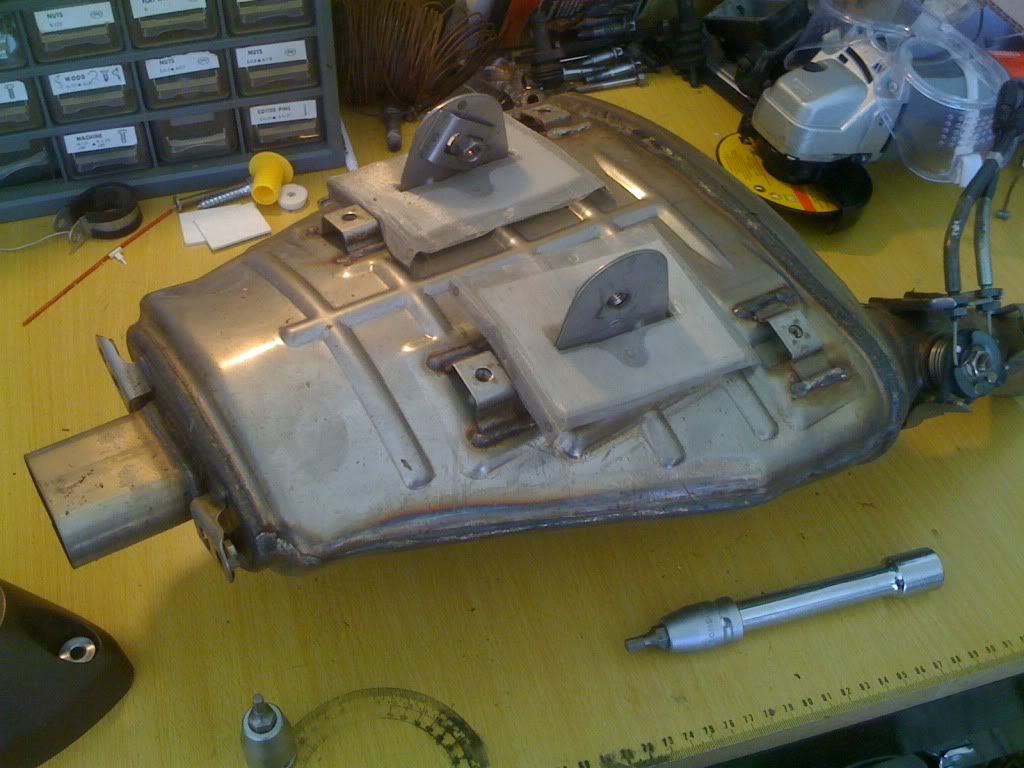
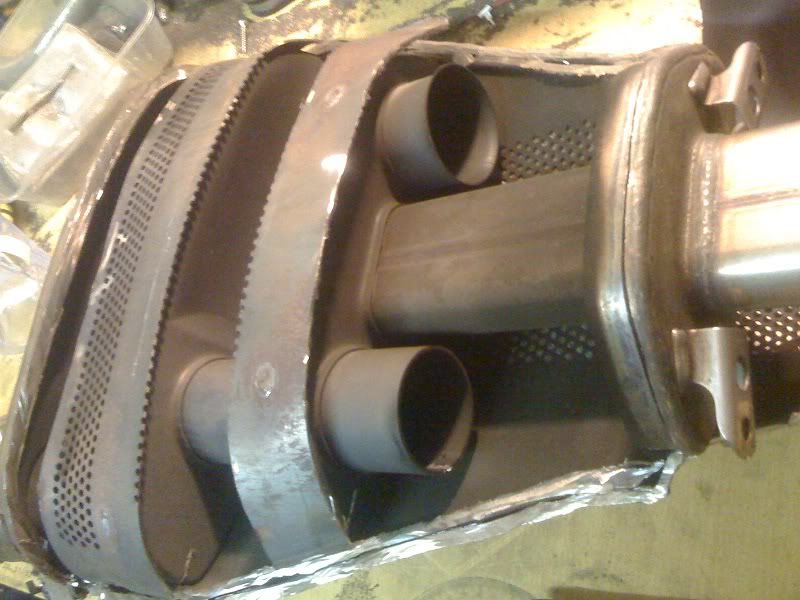
Carefully remove the wire mesh around the top brackets and this is what you should be left with
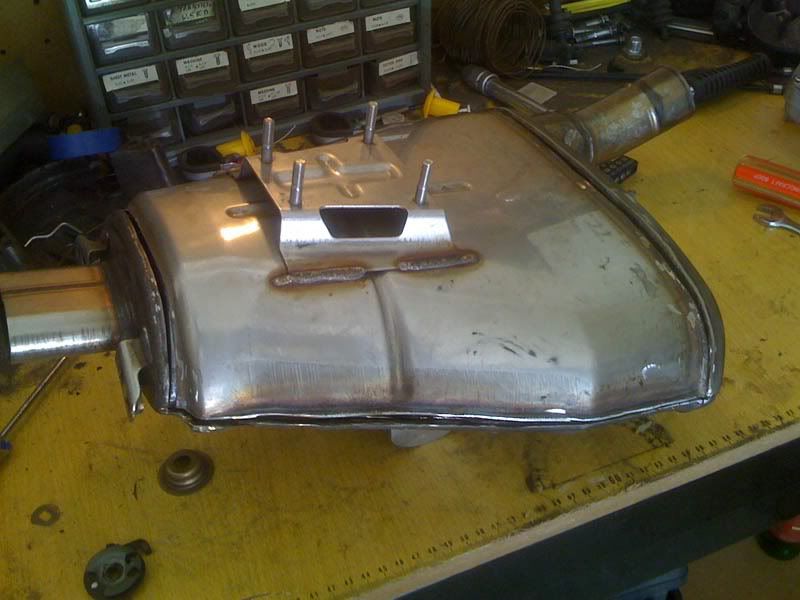
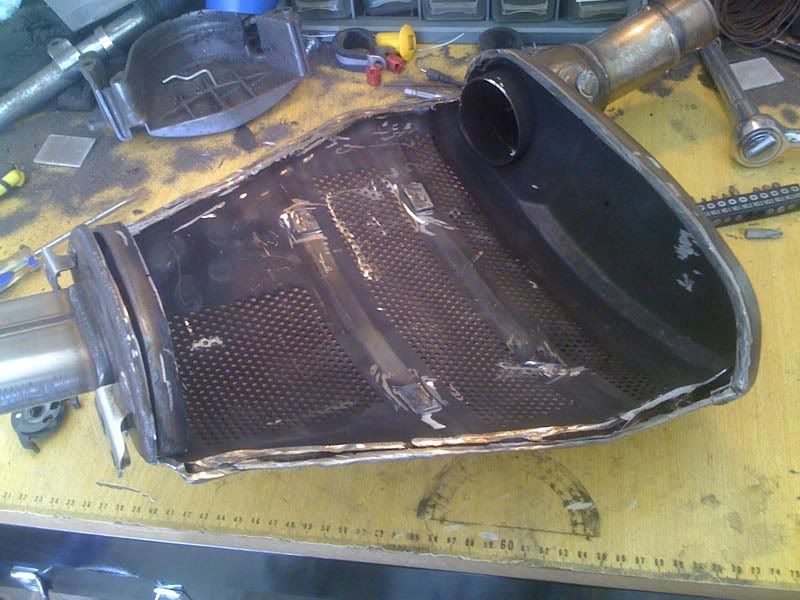
Turn the muffler upside down, so you can see the bottom, or the bit that attaches to the fender. Carefully cut ALONG the factory weld lines, and be prepared to cut in deep, as they did not skimp on the extra welding here. In places i cut as far as 2 cm, but don't be fooled as the muffler contains an inner layer which you will see later, that houses the actual maze of pipes. So you could very well have cut through the first layer and well on your way to the second.
I have seen some people cut along side the weld, but i have been told its best to cut on the weld, right down the middle.
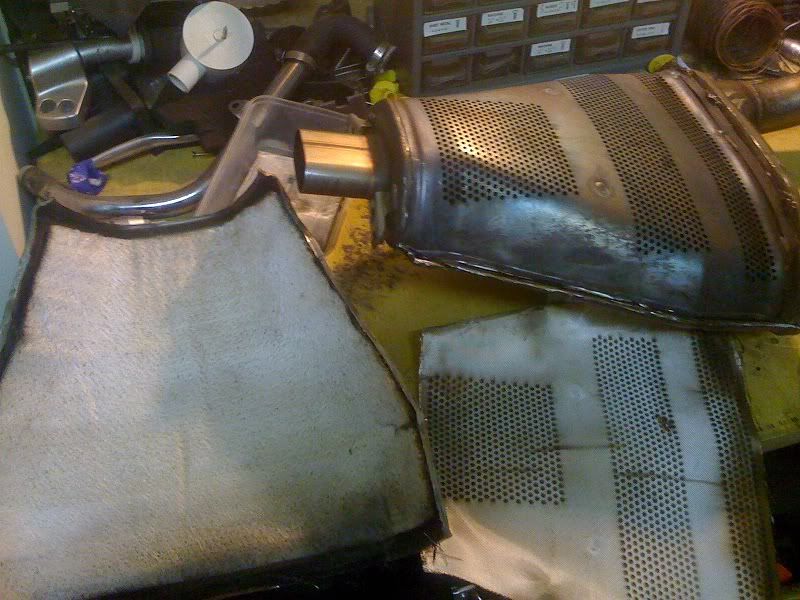
Crack open the lid you just cut out, and it will reveal a microfiber cloth (keep this) and the inner layer i was talking about above.
Now, you can be an idiot like me, and start hacking into the inner layer, or you can take the civilised approach and do the following:
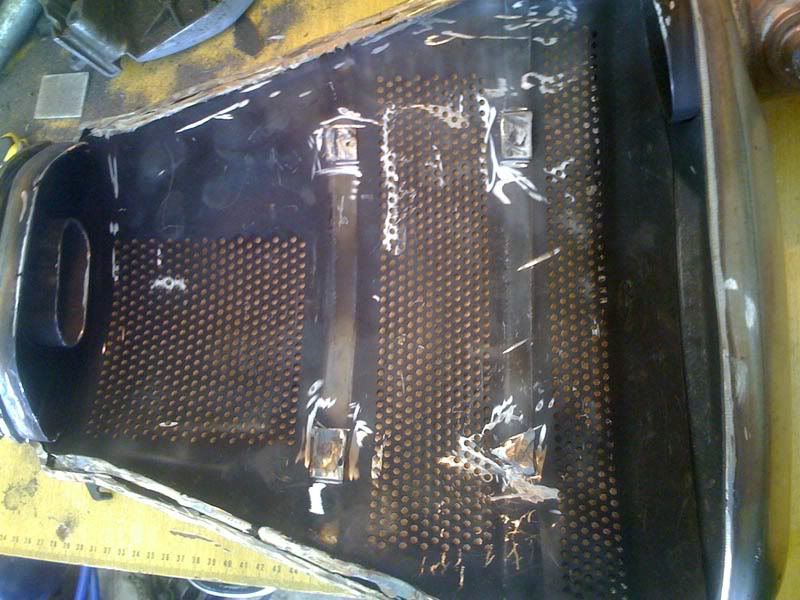
Cut the inner layer along the same line as the outer layer if you haven't already done so, and you will notice it wont pop out. Thats because its spot welded in 4 points. You will see them, but refer to the picture below if you cant see it. Now you can do a few things to remove the spot welds, easiest i think would be to cut a square around them as the objective here is to separate the inner layer from the metals below. Another way to get around this is to heat the fucker up and break the weld...but good luck with that. If you have any other ideas let me know ill add them in.
So in saying all that, i did the complete opposite, and by far the hardest way to go about this, i started hacking at the inner layer to bits, thinking i wouldn't need it. But you will. So the pictures below show it being hacked apart, and also show the spot welds which were the bane of my existence. So don't do what Donnie don't does!
A little bit more trimming and i could finally get the angle grinder in there...
Now lets assume we have removed the inner layer by cutting the welds out, you are left with a bunch of piping and brackets welded to the other side. I had a small grinder for this job, and i couldn't get the fucker in there to make a clean cut all the way through, so i had to hack at it bit by bit cutting out squares by squares until i had finally reached the other end. In this case a larger diameter cutting wheel would have come in handy, so if you have access to one, i suggest using it at this stage.
As you can see, there are 4 bits of metal still welded to the bottom of the remaining half layer, i did this because it was quick and simple, you may chose to resort to heating and breaking the welds off, but be mindful that behind this is the other half of the microfiber cloth, and also more heat shielding which you could damage. This is why i chose to live with the results below. I changed the cutting disk to a grinding disk and ground the suckers back until they weren't sharp any more. I don't know why as no hands will ever be in this compartment again, but it was my way of saying "i beat you"
Now, removing the butterfly valve. You can chose to do this or not, but for the sake of completeness, i decided i wanted it gone. This complicates matters as you will need to trick the servo motor which actuates the valve, there are a few videos on youtube on how to do this, and you can also see how it was done in my video below, but more on this later...
I didn't take pictures of this, so you will have to use your imagination a bit...
The butterfly valve which is sitting just at the edge of the intake into the muffler, has 2 screws affixing it to a pin which protrudes the pipe coming in to the muffler on 2 sides. This pin holds the valve in place while allowing it to rotate inside the pipe. Cables which you can see in the first and second picture, run up the tail of the bike and under your seat connect to a motor which pulls on these cables hence opening and closing the valve... After trying to unscrew the 2 screws which attach the valve to the pin for over 30 minutes, i gave up and decided to just leave it all in there. Later i find out that these 2 little screws are in fact welded in place, and are mainly just for show... thanks Kawasaki...you fuckers!
So Gazza cut the valve out for me with an oxy torch (i think, correct me if I'm wrong). You will also need to cut the pin which holds the valve in place but doing so will leave 2 holes in your exhaust which you don't want. These holes need to be welded up to prevent exhaust from escaping.

Remember how i told you that you were going to need that inner layer? This is where you will need it. Make sure that the outer layer has its fiberglass heat shield and microfiber cloth sitting on it, and weld the outer layer and inner layer together, sandwiching the materials between them as they would have been originally. yes i didn't do this, but Gazza came to the rescue again by manufacturing me a brace to hold all that stuff together.
I wouldn't recommend running the bike without this as i have seen some pics in a US forum of heat shielding being neglected which resulted in melted tail sections!
Now that you have a heat shield sandwich....mmmmm, sandwich.... weld it to the rest of the muffler.
And you are done, gutted out exhaust at the cost of some cutting wheels, maybe the odd spark flying into your eye despite having goggles on (ze goggles do nahzing!), a few hours out of your day and a not so stock sounding bike any more.
Don't get me wrong, i would kill for an actual slip on exhaust from Akra or 2 bros, but the reality is that i cant afford it at the moment so I'm happy to suffice with this, as I'm sure you would be too if you were trying to save a few hundred dollars.
Big thanks to the mystery man in the video below for helping me fit the exhaust and fabricating the servo motor fix for me
The servo motor for some reason was going spastic when the ignition was turned on, the FI light would remain off, but the motor would not stop pulsating (reminds me of me when i was younger).
Only way to stop it was to put a bit of pressure on it, but when the engine was started, you could see it doing the same thing again. Engine cut off at the kill switch, and it would continue to go nuts until the key was turned to the off position.
In the end the only way i could fix it was to connect the original cable holder to the motor, on top of the metal strip. attach one of the valve cables to it, and attach the other end to a spring i salvaged from a rear brake pedal. The spring put enough tension on the line to fool the motor into thinking it was still opening/shutting a valve.
In my research I've seen others encounter this issue, but not many replies on how to fix it.
So the verdict... As far as power loss goes, i have not noticed any substantial power loss, even down low which is where i thought this would hinder most of the performance. The noise while riding is not as noticeable as a proper slip on, but then again you paid peanuts for this so what did you expect? The sound of it while its driving past you or next to you is very noticeable but at idle you will need to listen for it other wise you might miss it. Just what you want if you don't want to attract any unwanted attention