Shamelessly copied off another forum. Plagiarism is alive and well, and serving the Internet community for years!
This is a method and technique for repairing fairing without spraying it. It doesn't eradicate the damage completely, but it certainly improves the appearance.
Works best on cracks, where there isn't actually any bits missing, however I have used the same method to replace sections. But to do this you need donor material of the same type of plastic, IT MUST BE THE SAME TYPE OF PLASTIC.
Most fairings are made of ABS plastic, a good source of donor material is car bumpers, this is available FREE from most accident repair centres, generally there is a pile of scrap bumpers that they have to pay to rid of. So if you need a piece, most don't mind. It is also a good place to get some practice plastic before you approach your bike.
I have been using this method for 10years or more, originally I used it to repair car bumpers, but now use it for fairings.
You will need:
A drill mounted wire brush or some course 80G sand paper.
A drill
1-2mm drill bit
A soldering iron, not a soldering gun. DON'T use a butane soldering iron. I prefer the spade type soldering ends, but you can use the pointy type.
Some donor plastic
A hacksaw blade
Stanley knife/blade
Touch up paint, as close as possible to your colour, laquer if a metallic. The touch up pens from Halfrauds with the metal nib are ideal!!!!
T-Cut Scratch remover, Fracla G3 or some other rubbing compound. NOT POLISH/WAX.
A duster or polishing cloth
Tape, masking, insulation. Gaffer tape sticks too well.
Some 1500G wet & dry
Kettle, coffee, milk and sugar
Patience
Be aware, the fumes released during this process are not pleasant. Make sure you do it in a ventilated area.
The following pictures are the cracks in question.
The first step is to clean the panel, remove any grass etc that may be stuck in the crack. Then use some tape to hold the pieces together, as seen in the pic above.
Once the front is clean, and the pieces are held together, you need access to the rear of the panel. This needs cleaning around the crack/damage, ALL paint and possible contaminents must be removed, otherwise they will ruin the repair and be weak.
I use a wire brush on a drill to remove the paint from the REAR of the panel, it is usually very thin and simply overspray.
Once the area is cleaned.
Now you need to locate the ends of the cracks, once you have found the ends, they need drilling with a fine drill bit. You need to honest here, even if it's a fine crack, drill it. This helps stop the crack from advancing after repaired.
Just to give you an idea of the size of this crack
Last edited by BrettZZR on Wed May 01, 2013 4:48 pm, edited 1 time in total.
As with welding metal, you may need some donor material, or filler rods. These are easy to make from the donor material, I simply cut the donor plastic into thin strips with a hacksaw blade. The donor material MUST be cleaned of all paint and contaminents, this is easier prior to cutting into strips.
Now that the area is clean and the cracks drilled, you need your soldering iron.
Due to the length and position of this crack I tagged the end to hold it in position. Simply roughly melt the two sides into each other, it doesn't matter how deep the 'weld' is, it is only temporary.
Once the crack is held, you need to open/'V' the crack out to ensure deep penetration and a good weld. When using a proper welder, you could use a dremmel or similar. However, that removes material. Using the soldering iron, press along the crack, this will melt the plastic and force some of the material out creating a channel or 'V' down the crack. I ensure my fingers are directly beneath the point that the soldering iron is entering, this allows me to gauge the heat and depth of the tip of the iron. You need to heat the plastic enough to melt it together as deeply as possible, but not so much that you will damage the paint. (Yes, I do burn my fingers occasionally, but I don't damage the paint too much).
In this case the plastic needed holding in place, so if needed you can every couple of inch, tag the crack together down the full length.
Once you are happy that it is held, continue the 'V' down the full length of the crack. As shown, you should be left with a channel that follows the crack and the displaced material at each side of the 'V'.
Once the 'V' is prepared down the full length of the crack, it's time to start filling the 'V'. The way to do this is to take material from both sides of the 'V' and melt them into each other, and the bottom of the 'V'. It must all be melted into each other, otherwise it won't stick, the melted plastic won't stick to cold hard plastic. Much like dripping melted candle wax onto a cold surface, it would simply peel off. Add filler material as needed to fill the channel, ensure it is properly melted into the repair.
This video shows the method I use to melt it all togher into the 'V'. You must be carefull to only melt the plastic, not actually burn it. It takes a bit of practise.
When you have got all the way down the crack like this, you should end up something like this:
You can smooth the repair by wiping down the length with the hot iron, at this point you may want to add some filler material to fill any low spots.
For high stress areas, front fenders etc, you may want to reinforce the repairs. This can easily be done using fibreglass matting. Before adding the fibreglass, the area MUST be roughened up, use some 80G paper or similar. If you fibreglass the repair as well, key the fibreglass and spray some clacker can colour over it to disguise the fibreglass.
I know you may be tempted to ignore the whole 'welding' stage and just reach for the fibreglass. It doesn't work properly, because the plastic can still flex down the crack, the crack is transmited through the fibreglass and it then cracks as well.
Well that's the rear of the cracks pretty much covered. We'll look at the front shortly.
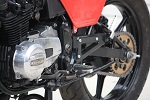
On this fairing we have a problem of a broken bracket.
To repair these, you need filler material to add strength. I was lucky, I have a donor knackered fairing that provided filler material, and yielded a complete bracket. However, it was for the opposite side, I had to modify it slightly. But it came out ok.
The repair is stronger than the norm of trying to use superglue.
Here the fairing panel is supported solely on the repaired bracket.
Once you have mastered this technique, you should be able to repair most damage to your fairing. You will have to practice that's all.
I keep practicing, not through choice, more people asking me to repair their fairings!
If you were going to spray the panel, simply repeat the process that we used on the rear, on the front of the panel. It will be much quicker on the front side, as you don't need as much penetration. You would pretty much just be finishing for paint. Prep the area for filler with some 120-150G, any courser and the plastic will go 'furry', a quick skim of filler, then finish the filler with 150-180G, prime the area and then flat with 800G wet & dry. Then spray it as normal.
As we are not spraying the panel, the repair will never disappear completely. It's all about trying to make the panel solid, and appear better.
The first step is to ensure that all the melted plastic from the repair process is below the level of the finished paint.
I use a razor type blade to trim the plastic back to below the paint, why, this will become obvious in a minute. You could use a Stanley knife blade or craft knife etc, but it MUST BE SHARP.
And be VERY CAREFULL NOT TO SCRATCH THE PAINT, or cut yourself. You heal, the paint doesn't.
Once all the excess plastic is removed from the cracked paint, you need to add paint to the crack. You can use a small brush to do this step, but I like the metal nibbed touch up pens.
BTW, I know the colour match is off. But it was the only stuff the lad had, it's near enough. The closer the colour match, the better the crack will look when done.
Carefully build up the paint in the cracks, it needs to be JUST above the level of the original paint. If you are doing a metallic colour, the laquer needs to be JUST above the level of the original paint.
As you can see, the appearance is a lot better, even with the colour being off.
The paint now needs to cure fully, leave it over night if needs be.
My camera has run out of battery now, so the next steps and pictures will follow. However there should be plenty to get you started.